


The before and after photo is the condensed version of the project. If you feel like sticking around to see how we did it, just know that you're in for a ride (it's a long post!) The cost breakdown is at the bottom.
Here we go! (starting from where I left off on my last post)

After getting the old fireplace surround torn out, it was time to build in the new framing. We were able to re-use a lot of the old wood which helped cut costs a wee bit. Originally the fireplace box was sitting on the ground and we thought it would look better if it were raised up a bit. We also wanted the new fireplace surround to go all the way to the ceiling for a more modern/dramatic look. I still can't thank my dad enough for helping us with this!

See mantle piece clamped up above the fireplace? It came out of a 1930's house! We had been searching high and low for a mantle and most of the new ones we liked fell into the $300 range. Ouch! One of my dad's friends was doing
demolition work on a 1930's house and was able to save the mantle. He heard we were looking for one and decided to gift it to us as a housewarming present. What a generous gift! It may have looked like a dirty piece of lumber at first, but it cleaned up quite well. It's solid as a rock and has a beautiful patina and tight grain (we think it's some type of maple).

Since it was so huge, we had to cut it down to make
it work for our fireplace. Let me tell you, I winced through the whole
cutting process. It just felt wrong to chop up something with so much
history, even though it was being "recycled." But we had to do what we had to do
and I'm happy to say I absolutely love how it turned out.
Below: my dad and opa working together.

We had a chunk big enough to make a couple corbels so I got to work making a template and cutting them out (note: it's always a good idea to wear safety glasses when using any kind of saw. I didn't, which is just silly)


The "rough draft" mantle:

Jumping back to the framing, you may have also noticed a gray pipe sticking out.

Since space is pretty tight in the condo, we decided ahead of time that we were going to mount our TV above the fireplace. We used 2" conduit for hiding cables that connect to the TV.

We drilled pilot holes for the mantle and then hung up Durok cement board. We left the sides open so we cold bolt in the mantle and corbels from the backside.We then hung up our TV wall mount and stained the raw pieces of the mantle to match the old color.
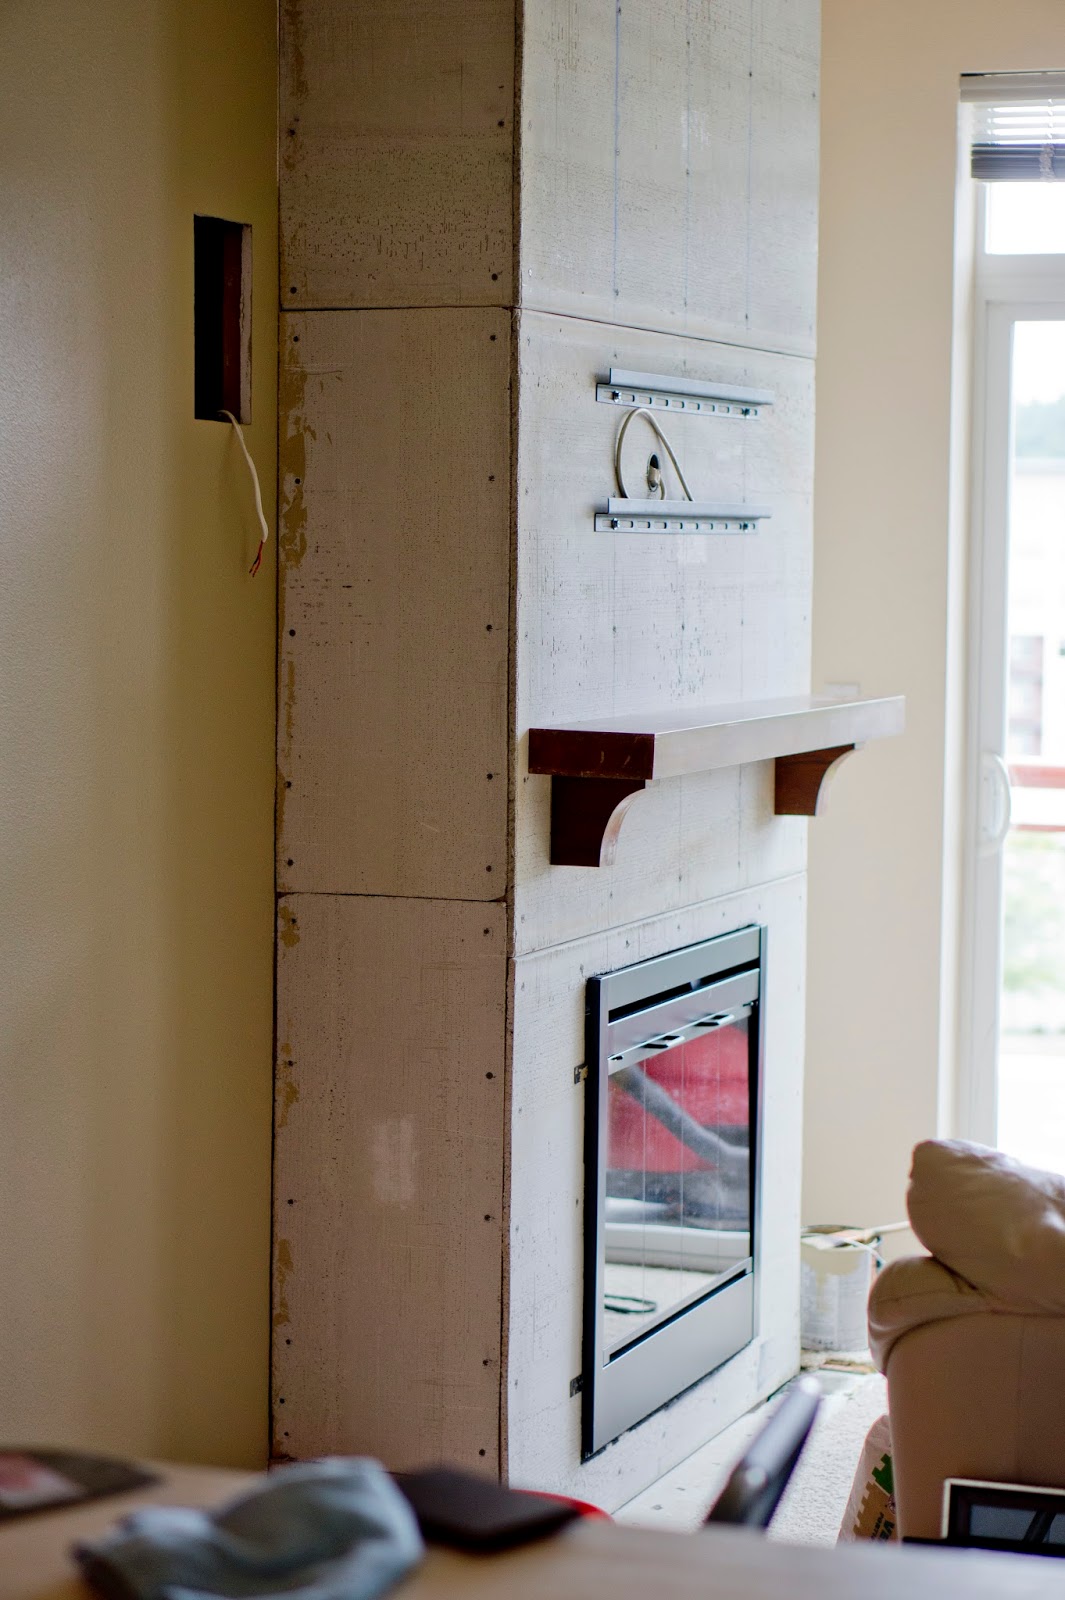
I also painted the fireplace box since it was pretty scuffed up from the previous owners. Thank you good ol' trusty can of satin black spray paint!

We hung up the TV to get the viewing angle right and make sure we would have enough room for the stone veneer behind it.

Our plan was to leave an empty space in the stone where the wall mount
was, but we realized that the TV wouldn't cover up as much of
the blank space as we thought it would. We took down the wall
mount and cut off several inches so the stone would cover up more. The patch was also painted black to hide it better.


We rented a paver saw and set it up in the bathroom. I've never used any sort of tile/paver saw before so I was a bit nervous, but it turned out to be incredibly easy. The key was to go slow. I do wish I could have done the cutting outdoors, that thing makes a MESS! I remembered my safety goggles this time.


Now it was time to put up the stone veneer (Eldorado stone in Chapel Hill color). We went with a manufactured stone veneer because: 1) It was much cheaper than real stone but still looked pretty convincing. 2) It was about half the weight (meaning we could get by with just using cement board by itself instead of reinforcing it with metal lath, and 3) It comes in "tiles" which means wayyyyy less cuts to make. I bought a dry powder mortar, added water and stirred using a drill mixer attachment until the mortar was the consistency of peanut butter. You can learn from my mistake here: a little goes a long way. I made way too much on the first batch for what we could get done in a day and ended up throwing out a lot of it (which resulted in us going back to Home Depot buy another bag when we finished up the project the next weekend, doh!)

We rented a paver saw and set it up in the bathroom. I've never used any sort of tile/paver saw before so I was a bit nervous, but it turned out to be incredibly easy. The key was to go slow. I do wish I could have done the cutting outdoors, that thing makes a MESS! I remembered my safety goggles this time.

Before making cuts, I laid out the tiles around the fireplace to get the configuration right (although it appears an extra corner piece snuck into the photo...hmmm). Side note: we purchased hardwood floors a while back and will eventually tear out the carpet in this room. Since we knew what the thickness of the floors would be, we made shims out of scrap wood that were slightly thicker than the flooring and placed them around the fireplace. We also cut up some of the underlayment and added it as well. This ensures that we can get the floors underneath the stone in the future.

Going up! Neal soaked down the cement board with a wet rag before spreading on the mortar so that the cement board wouldn't suck the moisture out of the mortar (which would weaken it). He also used a level to make sure that each row of tile was straight and used shims here and there to even out tiles that were wonky. Rubber gloves are definitely a must-have for this and we spent a couple extra bucks to get a stainless steel trowel with a rubber grip (it won't get rusty and it's definitely more comfortable to hold onto for an 8-hour work period!)


Overall we had a pretty good routine going, I made all the cuts and Neal put up the stone. We found that the best way to get the tiles to stick was to put mortar on the wall AND back butter the tiles. If we had purchased a trowel with larger notches we possibly could have avoided doing both (here's another chance to learn from our mistakes!) but since we didn't feel like making the trip back to the store we used this method instead. So far the tiles haven't tried to jump off the wall so I think we're safe.

Closeup of the (dirty) wall mount area:

I was pretty pleased with how the wall mount area turned out. It's small enough to be hidden by the TV
or if we go to sell/rent the condo in the future and someone doesn't
want their TV above the fireplace, they can easily cover up the spot
with some artwork or a mirror.

Done! Well... 95% done. We still need to paint the cut edges of the tile & any chips in the stone with the patch kit (you can't see it in the photo but the edges are a very light gray and stick out like a sore thumb in certain lighting conditions) and we need to do another pass at cleaning up drips from the mortar, both of which we'll will be working on today.

So, you might be wondering how much a project like this costs? For us it was about $1000, although we didn't have a lot of the tools needed to do the work and could have saved an extra $100 had I planned a bit more carefully. Definitely not a cheap project, but I do feel it makes a huge difference in the room (it makes it feel taller, which is a nice bonus). Here's an approximate breakdown of our costs:
$575 for the Eldorado stone veneer. We initially spent about $825, which included 20% extra sq ft of stone in case of breakage (which is pretty standard) but was also a bit extra because I forgot to subtract the sq ft area of the fireplace box when I was first figuring out how much stone we would need (dumb mistake). We didn't end up using two boxes and returned them for $250 in credit, but had to pay a restocking fee of $75).
$130 for two full days of paver saw rental
$45 for 3 bags of mortar (we could have saved $15 if I had not made too much mortar in the first batch)
$40 for a ladder (we didn't have one)
$210 for tools & other supplies (lumber for framing, conduit, cement board, screws, spray paint, stain & Old English for the mantle, the drill bit mixer attachment, a bucket, trowel, gloves, goggles, and anything else I may be forgetting)
P.S. We now have a (temporary) cabinet in the little alcove to the right for storing electronic components, although we eventually hope to find something with an industrial look. Also, in case you
noticed the different paint colors on either side of the fireplace, I still have some painting left to do on the walls. Lots to keep me busy, that's for sure!


I'm impressed! I love the transformation! It's definitely better than the previous fireplace. It's a good thing you came up with this idea because the stacked stone fireplace is definitely better. It's definitely not a cheap project but it's all worth it.
ReplyDeleteDHLandscapeDesign.com
That is brilliant! You did a really sharp improvisation there. People should secure and get themselves fireplaces in any ways that they can with all the means and options they've got available. It may have cost you a bit, but I think it's all worth it, seeing how beautiful your fireplace looks now.
ReplyDeleteLindsey Mckenzie @ Buchanan Fire and Outdoor
Looks great! One question. Where does the fireplace vent?
ReplyDeleteFireplaces in a home often use fuel that is typically a gas. But, LP is another fuel for pretty much anything which is utilized inside regular types of fireplaces.
ReplyDeleteFireplace
Thanks for sharing....!!!
What line of Eldorado stone is that?
ReplyDeleteWhat line of Eldorado stone is that?
ReplyDeleteWhat color and style are the stones you used ?
ReplyDeleteThe Eldorado Stone color is Chapel Hill
ReplyDeleteyour fireplace looks fabulous! Where did you get your Eldorado Stone? I'm having trouble finding it as most places require you to buy a "minimum" and we only need 45 linear sq ft.
ReplyDeleteyour fireplace looks fabulous! Where did you get your Eldorado Stone? I'm having trouble finding it as most places require you to buy a "minimum" and we only need 45 linear sq ft.
ReplyDeleteBeautiful! Very similar to what I am planning on doing? What type of fireplace is it? I have a dimplex electric. I am trying to decide how to cover right along the fireplace where you will see the cut stone as you stated. I have seen trim kits.
ReplyDeleteYes, you did a nice job, but your speakers are too close to the stone, your mantel is too small for all that stone and there is no hearth.
ReplyDeleteAmazing end result with that amazing fireplace Monica! You and your family really know how to do things well. And that Eldorado stone looks very modern.
ReplyDeleteMichael from Antique fireplaces
You may have posted already, but I cannot find it. But, I was hoping you had instructions on how to frame out for the fireplace and TV.
ReplyDelete