Jan 30, 2011

DIY: Gold Branch Mirror Tutorial

When looking at the after photo of my mini office makeover I realized that the space was reading more like it belonged in a kid's room than an adult's (or at least that's how I was seeing it anyway). Here's a little mirror project I did to give it a bit of glam and a more "grown up" feel.


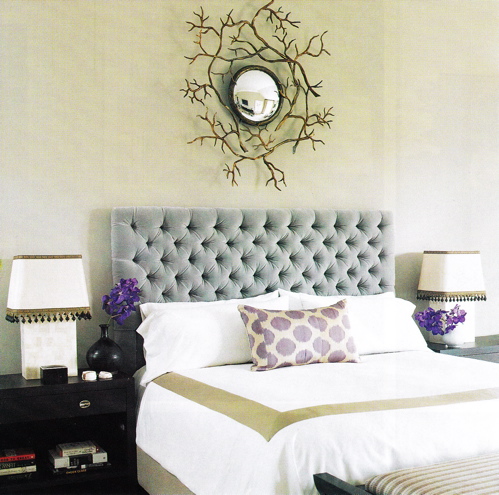
My inspiration first came from these beautiful mirrors:

Mecox ($1000)


Bellacor ($698)

 image via Decorpad


To start, I began by taking a walk in the woods and collecting sticks from the ground (it really helped that we  had a windstorm come through the week before!) I gathered a small pile and got to work breaking the branches up into smaller, more manageable pieces.


I used one of the medium sized mirrors from the pack of 5 that I got from Home Depot and placed the sticks around it until I was happy with the result.


Then I broke out the hot glue gun and began gluing the sticks together in place, trying not to let too much glue glob up and show.


By the time I was finished, I had a "frame" that could be held up. I flipped it over and added extra glue to the backsides of the sticks to reinforce them all.


Then it was time to paint the whole thing. I taped off the mirror...


...and used Rustoleum's specialty metallic gold spray paint, thanks to Bryn Alexandra's recommendation.


I gave the branches a coat on both sides and did two coats on the mirror, no primer needed. I was really happy with how it turned out, it really reminded me of metal. Because the branches that actually touch the mirror are a bit fragile, I decided to hang both pieces up separately. The mirror already had a hook on the back for hanging and after I got that up I used a nail to hang up the branch part and overlapped it on the mirror.


I was surprised by how quickly this project came together and in the end it cost me less than $20 ($15 for the 5 mirrors and $3-4 for the spray paint). I'm hoping to show an updated photo of the office with the mirror in it soon, once I finished up a few things!

A Little Update

I feel so bad for not posting in two weeks! I got a new job and I'm still adjusting to the new schedule while running my Etsy shop on the side as well. I'm really looking forward to having a little extra cash to tie up some loose ends on old projects and take on new ones as well. Speaking of new projects, I have one that I'll be sharing tomorrow!

Something else I'd like to do is make some large scale artwork for one of the rooms in our apartment. I've posted about this painting in the past and I still find it so fascinating. It's wonderfully bold and dramatic! (bonus points if you can name the artist, I'd love to know more about this piece!)


Apparently, my boyfriend picked up on the moody vibe I had in mind and painted a little something for me as a present:

 I absolutely love it! The colors are stunning and I was completely floored by how much thought he put into it. It's framed and sitting on my dresser right now, but I think it would look so sharp blown up into large scale artwork. We'll just have to wait and see where things go!

Jan 15, 2011

Shopping Loot

Remember how I posted about the $250 in Visa gift cards I got for Christmas? Here's all the things I got for updating my bedroom, dining room and office area:

Store Bought Items:
A white duvet cover + 2 pillow cases from Ikea
Gold spray paint
Pumpkin Orange spray paint
2 tablecloths from Target
2 lampshades from Target

A bedskirt from Bed Bath & Beyond


Smaller things - sandpaper, glue, rit dye (Home Depot/Ace Hardware/Michaels)
A set of Martha Stewart mirrors from Home Depot - I've got plans for these

Thrift Store Finds:
2 funky duvet covers (above)
2 pillows (above)
Chrome pillar candle holder
Chrome sea shell
Gold bird figurine
Red-Orange fabric
A mint julep cup

And... a dining table!

The table was only $75 (marked down from $275) and has a leaf extension to make it 7.5 ft long. The sad part is it doesn't fit in our dining area, (and believe me, I tried) but how could I pass it up? I'll have a house someday and it's the perfect table for dinner parties. I plan on stripping and staining it a warm brown. It's over at my brother's place right now waiting for attention.


All that and I only went $2 over my "budget" of $250. Not too shabby! Time to start some projects!

Jan 9, 2011

Reupholstering a Chair

Since I'm in the process of redoing my bedroom/office, I thought I'd share my process of reupholstering a chair. I was in the market for something pretty that could be used as an office chair when I happened to stumble upon this one for free - I found it sitting outside next to the trash bin at my old apartment. I was hesitant to take it in because it looked really dingy (there was also green fringe trim on the bottom) but after going past it several times throughout the day I finally caved.


I wanted something a bit more feminine for my office space. I had received a free can of Glidden paint in white and decided that was the color I was going to paint the wood since the original finish was badly scuffed, chipped and wearing away completely in spots. I removed the layer of green upholstery fabric to save for later, and that's when I discovered a much prettier fabric underneath (although it was really stained and gross)

This fabric was nailed on with tiny handmade nails, similar to this:


After removing what seemed like a million of them, I finally was down to the insides of the chair and that's when I realized it was full of coir and horse hair! Coir is a fiber that comes from the husk of a coconut shell (it's seen a lot today in doormats). The horse hair thing is what had me worried - what if this chair was old? I can't paint an antique white, I'd be burned at the stake! Well, after researching for several days, I couldn't find anything mentioning my chair was some super rare antique piece. There were a few similar ones that sold for $50-125 which is about what I'd end up spending on a new office chair anyways. With that in mind, I took a deep breath and started painting. 


When all was said and done, I started in on upholstering it. I kept the coir and horse hair but added some new foam on top for more support. I used the green fabric as a template to trace the pattern onto my new linen fabric.


 I stapled it on using the same method I had used in art class to stretch canvases. Starting with a staple on one end, I moved to the opposite end and pulled the fabric tight to place another staple. I then went to the untouched sides and did the same thing so that by the time I was finished, I had a cross like this:

{image via Marion Boddy-Evans - About.com}
By continually switching sides to put in staples, this ensures that your fabric will be pulled as tight as possible resulting in a professional finished look. As you can see below, I was a little slack in a few places, resulting in some waves - eep!


The next step was to add something to cover up all those staples. I could have gone with gimp, which is a really affordable option, but I really liked the look of double welting. I purchased my double welt cord from Ebay and followed this tutorial from Curbly (I didn't switch out my sewing machine foot for a double welt foot or a zipper foot and still had success). With all my pieces cut out and ready, I glued them in place using hot glue. As I was gluing I was able to pull some of the fabric a little tighter to reduce the waves a little, but someday I may end up tearing the thing apart again to fix it completely.


...and ta-da! The chair as it is right now. The bottom still seems a bit plain so I've been thinking of adding nail head trim. I think it would also be fun to add a toss pillow in Pantone's 2011 Color of the Year - Honeysuckle. What do you think?


Jan 8, 2011

Creating a Stylish and Organized Home Office

Like many other bloggers, I've caught the organization bug. Running a business from home requires that I have a space dedicated for working and unfortunately that space must share itself with my bedroom, a room that is 9.5 ft x 10.5 ft. Can you say yikes? Needless to say, I'd not only like to have my office space be clean, organized and functional, but (since I look at it a lot) stylish as well. While I'm off daydreaming about how to make that happen, here are a few of my favorite items one could use to create a stylish (and functional!) office space.


Jan 5, 2011

New prints added to my shop!

I've been busy updating my bedroom to show you all, but in the meantime I wanted to share some new prints available in my Etsy shop!


Blog Widget by LinkWithin